Week 10
JavaScript, jQuery and Vue
Mockups Due Next Week
Final project mockups are due before next class!
The document.ready() event
We need to wait for the browser to finish loading and rendering all of the HTML elelments on the page before attempting to run our jQuery scripts. Until that is complete, the DOM tree is not populated and we cannot access the elements that we want to interact with.
Below we compare how to accomplish this with vanilla JavaScript and with jQuery.
Plain JavaScript
const initializeApp = function() {
  // do stuff here
  $('.page-title').slideDown(300)
}
Document.addEventListener('DOMContentLoaded', initializeApp, false)
jQuery
$(document).ready(
  // do stuff here
  $('.page-title').slideDown(300)
)
Traversing the DOM with jQuery
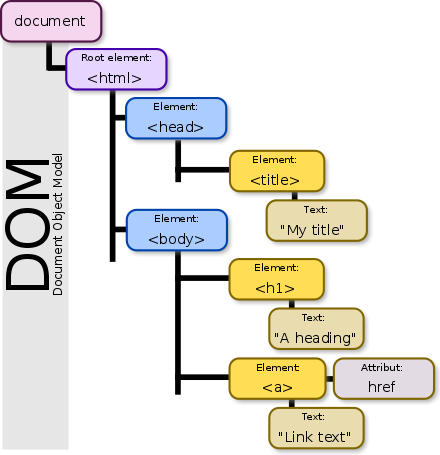
Think of the DOM (Document Object Model) as a tree.
jQuery provides many convenience functions for travsering the DOM from a given starting selector. Check out the official documentation for the full list, but we will review a few examples here.
Suppose that we have an HTML document containing this ...
<div class="boxes">
  <div id="first-box" class="box">
    <div id="first-prize" class="prize"></div>
  </div>
  <div id="second-box" class="box">
    <div id="second-prize" class="prize"></div>
  </div>
</div>
Traverse Down
The find() method searches for all matching selectors down to the deepest level decendant.
$('.boxes').find('.prize')
// returns #first-prize and #second-prize elements
The children() method searches the first level decendants only.
$('.boxes').children('.prize')
// returns nothing
$('.boxes').children('.box')
// returns #first-box and #second-box elements
Traverse Up
The parent() method returns the immediate parent element of the selected element.
$('#first-prize')
  .parent()
  .css('backgorund-color', 'indigo')
// sets the `background-color` of the `#first-box` to indigo.
The parents() method searches up the DOM tree from the currently select element. If no selector is provided as an argument, it will find all ancestor nodes up to the root element.
If a selector is provided it will find only those ancestors that match the selector.
The parentsUntil() method will return all the element between the starting elelment and the matching selector.
$('#first-prize').parentsUntil('.boxes')
// returns the #first-box element
The closest() method works similarly, but rather than reuturning a collection elements it returns only the first ancestor matching the given selector argument.
$('#first-prize').closest('.boxes')
// returns the .boxes element
Traverse Sideways
jQuery also offers several methods to assist with selecting sibling elements.
$('#first-box').next()
// returns the #second-box element
Updating the DOM with jQuery
Sometimes we need to dynamically add new HTML elements into the DOM. jQuery has several methods to help depending on the context.
e.g. if we run
$('.prize').after('<p>Test</p>')
Then our HTML will be updated to add the new <p> elements as siblings to the given selector like this:
<div class="boxes">
  <div id="first-box" class="box">
    <div id="first-prize" class="prize"></div>
    <p>Test</p>
  </div>
  <div id="second-box" class="box">
    <div id="second-prize" class="prize"></div>
    <p>Test</p>
  </div>
</div>
On the other hand, if we used the append() method instead, the <p> tags would be inserted as the last child of the given selector.
e.g.
$('.prize').append('<p>Test</p>')
<div class="boxes">
  <div id="first-box" class="box">
    <div id="first-prize" class="prize"><p>Test</p></div>
  </div>
  <div id="second-box" class="box">
    <div id="second-prize" class="prize"><p>Test</p></div>
  </div>
</div>
There is a lot more that you can do with jQuery. Read through the official documentation and learn what the full capabilities are.
Exercise 10-1: jQuery DOM Tricks
Get the starter code from GitHub Classroom
You will want to have the jQuery documentation open for this exercise.
Select the elements with the class 'page-title' and apply the
slideDown()animation with a duration of 500 ms (1/2 second).Select the elements with the class 'hide-me' and add an event listener for the click event. When the elelment is clicked, call the jQuery
hide()method.Select the elements with the class 'fade-me' and add an event listener for the click event. When the elelment is clicked, call the
fadeOut()method. Don't forget, we need to update the visible box-count value.Add an event listener to the click event on the increment button that when triggered, appends a new box to the demo-boxes group and updates the box count.
Add the fade event listener to our new box.
Add an event listener to the click event on the decrement button that when triggered, removes the last box from the demo-boxes group, and updates the box count.
Add an event listener to the click event on the show-hidden button that when triggered, fades in the hidden boxes from the demo-boxes group, and updates the box count.
Refactor to create a reusable function to set the box count.
Refactor to create a reusable function to apply the event listeners.
Vue into the future
Last week we looked at the old way of managing interactive updates to the DOM using jQuery. This is OK if you are not touching many elelment in your UI, but it can get pretty cumbersome to manually code out the HTML structure for each card in our gallery. What happens when we have 50 cards instead of five? What happens when the card contents are being updated remotely and stored in a database?
There is a better way!
Modern frontend JavaScript frameworks like Vue.js take a more data-centric approach, the benefits of which start to become appearent when we make our Gallery Card example a little more realistic by dynamically loading the details for each card from a remote API.
The solution is to create a new "custom component" that we can drop into our HTML and have it act like a template with variables that we can inject the content into. Think about it. The HTML structure of each card is the same. What changes is the image, the title, and the description.
Let's suppose that we can load all of those card content properties into an array of card objects by calling some remote server's API resource endpoint. We will get back an array of card object details like this ...
[
  {
    "id": 1,
    "title": "Mountain Lake",
    "description": "Lorem ipsum dolor sit amet, consectetur adipisicing elit. Earum nostrum sequi sed officia consequuntur debitis illum sint ipsam provident pariatur.",
    "imgUrl": "http://www.gstatic.com/webp/gallery/1.jpg",
    "isFeatured": false
  },
  {
    "id": 2,
    "title": "White water kyaking",
    "description": "Lorem ipsum dolor sit amet, consectetur adipisicing elit.",
    "imgUrl": "http://www.gstatic.com/webp/gallery/2.jpg",
    "isFeatured": true
  },
  {
    "id": 3,
    "title": "Walk in the rain",
    "description": "Lorem ipsum dolor sit amet, consectetur adipisicing elit.",
    "imgUrl": "http://www.gstatic.com/webp/gallery/3.jpg",
    "isFeatured": false
  },
  {
    "id": 4,
    "title": "Tree in bloom",
    "description": "Lorem ipsum dolor sit amet, consectetur adipisicing elit.",
    "imgUrl": "http://www.gstatic.com/webp/gallery/4.jpg",
    "isFeatured": false
  },
  {
    "id": 5,
    "title": "Breathing fire!",
    "description": "Lorem ipsum dolor sit amet, consectetur adipisicing elit.",
    "imgUrl": "http://www.gstatic.com/webp/gallery/5.jpg",
    "isFeatured": true
  },
  {
    "id": 6,
    "title": "Mountain Lake",
    "description": "Lorem ipsum dolor sit amet, consectetur adipisicing elit.",
    "imgUrl": "http://www.gstatic.com/webp/gallery/1.jpg",
    "isFeatured": false
  }
]
We could then iterate over the array and pull out one card object at a time and pass that into our "custom component" which would act like a template and insert the various object properties into designated placeholders in the HTML layout.
// a single card object plucked from the array
{
  "id": 5,
  "title": "Breathing fire!",
  "description": "Lorem ipsum dolor sit amet, consectetur adipisicing elit.",
  "imgUrl": "http://www.gstatic.com/webp/gallery/5.jpg",
  "isFeatured": true
}
Define a Vue component
Vue.js makes this so easy! Let's define the basic properties of our new Vue component. We will name the component 'gallery-card' and then pass a plain JavaScript object with various properties to tell Vue how to configure our component. Vue has a large set of possible configuration options, but in this case we will use: template, props, data, and menthods.
Vue.component('gallery-card', {
  template: ``, // we will expand on this one in a minute
  props: ['card'], // this is the card object from the API that we pass in
  data() {
    // we can define some internal variables in our component
    // and whenever they change, Vue automatically updates only the part of
    // the screen that is dependent on that variable.
    return {
      isCovered: true // in this case we want to keep track of whether or
      // not the card should have the covered class applied.
    }
  },
  methods: {
    // we can also define interal functions or methods inside our component
    // here we will toggle the value of our isCovered variable from true to
    // false and vice-versa when the mouseenter and mouseleave events are
    // fired on this component.  We will define the event listener in
    // the template.
    toggleCover() {
      this.isCovered = !this.isCovered
    }
  }
})
OK now for the part that actually shows something on the screen, the template. We can start by simply copying the HTML we have for one of the div.card elements in our jQuery example.
<div class="card">
  <div class="card-image">
    <img src="http://www.gstatic.com/webp/gallery/1.jpg" alt="" />
  </div>
  <div class="card-body cover">
    <p class="card-title">Mountain lake</p>
    <p>
      Lorem ipsum dolor sit amet, consectetur adipisicing elit. Earum nostrum
      sequi sed officia consequuntur debitis illum sint ipsam provident
      pariatur.
    </p>
  </div>
  <div class="card-footer cover"><button type="button">Buy now</button></div>
</div>
Now we will replace the specific content with placeholder variables and if it forms part of the inner HTML content of an element, we will wrap these variables in double braces known as mustache syntax, e.g.
<p> {{ card.title }} </p>
If we want to use that vaiable with an HTML attibute like src, we will prefix the attribute with v-bind:src or the shorthand version of just :src. This makes those properties dynamic and will reactively update the screen when the bound value changes.
<div class="card">
  <div class="card-image"><img v-bind:src="card.imgUrl" alt="" /></div>
  <div class="card-body cover">
    <p class="card-title">{{ card.title }}</p>
    <p>{{ card.description }}</p>
  </div>
  <div class="card-footer cover"><button type="button">Buy now</button></div>
</div>
OK. This tells Vue where to put the card object data in our template. But, our card-body and card-footer elements have the .cover class hard coded. We want that to be a dynamic attribute like we did with the image src.
<div class="card">
  <div class="card-image"><img v-bind:src="card.imgUrl" alt="" /></div>
  <div class="card-body" v-bind:class="{ cover: isCovered }">
    <p class="card-title">{{ card.title }}</p>
    <p>{{ card.description }}</p>
  </div>
  <div class="card-footer" v-bind:class="{ cover: isCovered }">
    <button type="button">Buy now</button>
  </div>
</div>
This time we didn't directly bind a variable, we bound a JavaScript object. Vue knows that we are binding to the class attribute and interperates this based on the JS Object's { key: value }. Vue expects the key to be a CSS class name and the value to be an expression that evaluates to either TRUE or FALSE.
In this example Vue will add the .cover CSS class only if the value of our special internal variable isCovered is TRUE – which we set as the default value.
OK, so how do we add the event listeners so that we can toggle the value of isCovered? It couldn't be simpler. We add a special HTML attribute to the element that we want to listen. That attribute takes the form of @eventName="functionToCall".
We need to tell the .card element to listen for the mouseenter and mouseleave events, and when it hears one of those events, run the toggleCover method.
<div class="card" @mouseenter="toggleCover" @mouseleave="toggleCover">
  <div class="card-image"><img v-bind:src="card.imgUrl" alt="" /></div>
  <div class="card-body" v-bind:class="{ cover: isCovered }">
    <p class="card-title">{{ card.title }}</p>
    <p>{{ card.description }}</p>
  </div>
  <div class="card-footer" v-bind:class="{ cover: isCovered }">
    <button type="button">Buy now</button>
  </div>
</div>
There is one last enhancement. We want to be able to dynaimcally assign the .wide class to a card based on it's isFeatured property. Remember, the .wide class makes the card take up two columns by applying grid-column: span 2. This time, let's use the shorthand syntax for the v-bind directive.
<div
  class="card"
  :class="{ wide: card.isFeatured }"
  @mouseenter="toggleCover"
  @mouseleave="toggleCover"
>
  <div class="card-image"><img v-bind:src="card.imgUrl" alt="" /></div>
  <div class="card-body" v-bind:class="{ cover: isCovered }">
    <p class="card-title">{{ card.title }}</p>
    <p>{{ card.description }}</p>
  </div>
  <div class="card-footer" v-bind:class="{ cover: isCovered }">
    <button type="button">Buy now</button>
  </div>
</div>
Great! Our template is complete, let's insert it as the value of the template property of our component.
Vue.component('gallery-card', {
  template: `
    <div
      class="card"
      :class="{ wide: card.isFeatured }"
      @mouseenter="toggleCover"
      @mouseleave="toggleCover"
    >
      <div class="card-image"><img v-bind:src="card.imgUrl" alt="" /></div>
      <div class="card-body" v-bind:class="{ cover: isCovered }">
        <p class="card-title">{{ card.title }}</p>
        <p>{{ card.description }}</p>
      </div>
      <div class="card-footer" v-bind:class="{ cover: isCovered }">
        <button type="button">Buy now</button>
      </div>
    </div>`,
  props: ['card'],
  data() {
    return {
      isCovered: true
    }
  },
  methods: {
    toggleCover() {
      this.isCovered = !this.isCovered
    }
  }
})
Update HTML
The v-for directive tells Vue to iterate over the gallery array and pull out each card object one at a time and store it in the temparary card variable. We then bind that card variable to the gallery-card component's card property so that it can be used in the template.
<div id="gallery" class="container">
  <gallery-card
    v-for="card in gallery"
    v-bind:key="card.id"
    v-bind:card="card"
  ></gallery-card>
</div>
Initialize our Vue app
Initialize our Vue app on the #gallery node. Use the array of gallery card objects as the source to populate the grid.
const app = new Vue({
  el: '#gallery', // this tells Vue which HTML element to mount on
  data: {
    gallery: [] // this is where we will load our array of card objects
  }
})
It is running and there are no errors on the console, but we don't see anything. There are zero card objects to render. We need to load the data from the API server.
Just before Vue renders our App to the page, we want to make an API call to retrieve the remote data about our Gallery Cards. Vue provides a number of convenient lifecycle events that we can listen for and use as triggers for actions. In this case we want to listen for the created event. We will then add a corespondingly named method to our main Vue App, in which we will use fetch to get the remote data and then store the result in our gallery responsive data variable.
const app = new Vue({
  el: '#gallery',
  data: {
    gallery: []
  },
  created() {
    fetch('https://api.myjson.com/bins/1exi2n')
      .then(response => response.json())
      .then(jsonData => {
        this.gallery = jsonData
      })
  }
})
Awesome!! Now whenever the page loads, our simple Vue App will:
- call the API
- store the retrieved array of card object data in the gallery variable
- iterate over the gallery array and insert a new
<gallery-card>element for each object - insert the card object's properties as the content in the
<gallery-card>template
The complete Vue source code
Here is the complete css-grid-card-vue.html file.
<!DOCTYPE html>
<html lang="en-CA">

<head>
  <meta charset="UTF-8">
  <meta name="viewport" content="width=device-width, initial-scale=1.0">
  <meta http-equiv="X-UA-Compatible" content="ie=edge">
  <title>Responsive CSS Grid | Vue.js</title>
  <style>
    html {
      box-sizing: border-box;
      font-size: 14px;
      font-family:
        -apple-system,
        BlinkMacSystemFont,
        'Segoe UI',
        Roboto,
        Oxygen,
        Ubuntu,
        Cantarell,
        'Open Sans',
        'Helvetica Neue',
        sans-serif;
      margin: 0;
      padding: 0;
    }

    body {
      background-color: rgba(75, 0, 130, 0.06);
      padding: 0.5rem;
    }

    h1 {
      color: rgba(0, 0, 0, .54);
      font-size: 1.6rem;
    }

    .container {
      display: grid;
      grid-gap: 0.75rem;
      grid-template-columns: repeat(auto-fit, minmax(225px, 1fr));
      grid-auto-rows: 420px;
      grid-auto-flow: row dense;
    }

    .card {
      background-color: #feffff;
      border-radius: 0.25rem;
      box-shadow: 0 1px 0.75rem rgba(0, 0, 0, .23);
      display: flex;
      flex-direction: column;
      overflow: hidden;
    }

    .card-image {
      flex-grow: 1;
      height: 200px;
    }

    .card-image>img,
    .container>div>img {
      object-fit: cover;
      height: 100%;
      width: 100%;
    }

    .card-body {
      height: 200px;
      padding: 0.5em;
      transition: all .25s;
    }

    .card-title {
      font-size: 1.25em;
      font-weight: 600;
      margin-bottom: 0.5rem;
    }

    .card-footer {
      margin: auto 0 1em 0;
      padding: 0 0.5em;
      transition: all .25s;
    }

    .card-footer button {
      background-color: transparent;
      border: 1px solid indigo;
      border-radius: 0.25rem;
      color: indigo;
      line-height: 1em;
      padding: 0.5em;
      text-align: center;
      text-transform: uppercase;
    }

    .card-footer button:focus,
    .card-footer button:hover {
      background-color: indigo;
      color: rgba(255, 255, 255, 0.9);
    }

    .cover {
      visibility: hidden;
      height: 0;
      margin: 0;
      opacity: 0;
      padding: 0;
      transition: all .4s;
    }

    @media screen and (min-width: 500px) {
      .wide {
        grid-column: span 2;
      }
    }
  </style>
</head>

<body>
  <h1>CSS-Grid Cards</h1>
  <div id="gallery" class="container">
    <gallery-card v-for="card in gallery" :key="card.id" :card="card"></gallery-card>
  </div>

  <!-- Load Vue.js from CDN -->
  <script src="https://unpkg.com/vue@2.5.13/dist/vue.js"></script>

  <!-- Our custom script -->
  <script>
    // Define our new custom HTML element
    Vue.component('gallery-card', {
      template: `
        <div
          class="card"
          :class="{ wide: card.isFeatured }"
          @mouseenter="toggleCover"
          @mouseleave="toggleCover"
        >
          <div class="card-image">
            <img :src="card.imgUrl" alt="">
          </div>
          <div class="card-body" :class="{ cover: isCovered }">
            <p class="card-title">{{ card.title }}</p>
            <p>{{ card.description }}</p>
          </div>
          <div class="card-footer" :class="{ cover: isCovered }">
            <button type="button">Buy now</button>
          </div>
        </div>`,
      props: ['card'],
      data() {
        return {
          isCovered: true
        }
      },
      methods: {
        toggleCover() {
          this.isCovered = !this.isCovered
        }
      }
    })
    // Initialize our Vue app on the #gallery node.
    // Use the array of gallery card objects to populate the grid.
    const app = new Vue({
      el: '#gallery',
      data: {
        gallery: []
      },
      created() {
        fetch('https://api.myjson.com/bins/1exi2n')
          .then(response => response.json())
          .then(jsonData => {
            this.gallery = jsonData
          })
      }
    })
  </script>
</body>

</html>What's next?
This is a foreshadowing of what we will cover in MTM6430 Web Applications in 4th term. Don't worry we will start from the beginning and explain all of the concepts demonstrated here, step-by-step. It is quick to learn and fun to use!
If you want to get a head start, the official Vue documentation is really well done and easy to read.